Strawberry Vegan Cheesecake

Every year on my husband’s birthday (which happens to be in May) I try to make the PERFECT homemade, strawberry cake for him.
Why?
I’ve been trying to get him to switch from the tradition of a particular, highly processed (not so good for you) store bought cake he looks forward to each year (more out of nostalgia than anything else). It seems a birthday just isn’t complete without this store bought favorite.
My hope has always been that he would enjoy a new tradition of homemade cake on his birthday (and perhaps eat something a little better for him in the process). I have chosen strawberry because it’s one of his favorite flavors and it happens to be in season this time of year. Believe me, I’ve been through many, many, many incarnations of strawberry cake striving for the perfect one that would finally convert him.
Year after year.
Cake after cake.
And while they’ve all been good, none have managed to turn his head from the inevitable prepackaged cake.
In fact, we usually end up with two cakes; one from the store and one homemade because much as I try, who am I to mess with birthday bliss.
However, this past year I think I FINALLY stumbled upon THE ONE!
THE cake that converted him into a believer in homemade cake on your birthday!!!!
This is it! This is the one!
And this recipe is actually fairly easy to put together, it just takes some time to set up (it’s a two day process because you have to soak cashews the night before you make it). I also suggest making it the night before you serve it and thawing it a bit before removing from the pan and slicing to serve. I promise, one taste of this and you will never want a traditional cheesecake again. It’s worth the time investment, especially if it converts a “toughy” like my husband to “real food”. This vegan version is as pleasing to your tongue as it is to your digestion. And it’s a restaurant quality presentation for the price of a toothpick!
Ingredients:
For the crust:
1 1/2 cups pitted dates
3/4 cup walnuts
1 TBSP melted coconut oil
1/4 teaspoon salt
For the cheesecake filling:
2 1/2 cups cashews, soaked overnight
1 cup full fat coconut milk
1/8 teaspoon vanilla powder (optional)
3/4 cup maple syrup
1 TBSP vanilla extract
pinch of salt
1 TBSP melted coconut oil
Juice of 3 limes
Strawberry Swirl Sauce:
3/4 cup frozen strawberries
1/4 cup fresh raspberries
1/3 cup maple syrup
Directions:
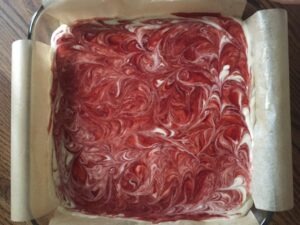
Prepare an 8×8 square pan with parchment paper. Take two long piece of parchment and lay one across the pan vertically and the other across the pan horizontally. The excess hanging off the edges will act as handles and allow you to lift it out of the pan easily when you are finished.
For the crust: Place all the ingredients into a food processor and process until it’s fully combined and sticking together. Then press it into the bottom of your prepared pan in a flat even layer.
For the cheesecake filling:
Combine the drained and rinsed cashews, milk, vanilla powder, and maple syrup in a Vitamix and blend until smooth (About 2 minutes). Add the rest of the filling ingredients and blend until combined. Pour this layer on top of the crust.
For the strawberry swirl sauce:
Place all the sauce ingredients into a small sauce pot and bring to a simmer. As you simmer the sauce, mash the strawberries with a potato masher to help break them down. Once all of the berries are mostly broken down, continue to simmer the sauce to allow the moisture to evaporate and the sauce to thicken and reduce down to a thick enough texture to make a sauce. Strain your sauce through a fine mesh strainer to remove the seeds and strawberry pulp. Check for consistency. If it’s still too watery, place the sauce back into the pot and simmer again until it’s reduced down to a sauce texture.
Pour the strawberry sauce onto the filling layer in a swirl motion so you can still see some areas of white between the red. Then take a toothpick and begin swirling the red into the white in small circular motions. The more little circles you the make the better the marbling will look, so don’t be afraid to swirl it up.
Once it looks marbled to your liking, place the pan in the freezer and freeze overnight (3 hours minimum). Use the parchment to lift the cake out of the pan and slice into squares.
Eat!
- For the crust:
- 1½ cups pitted dates
- ¾ cup walnuts
- 1 TBSP melted coconut oil
- ¼ teaspoon salt
- For the cheesecake filling:
- 2½ cups cashews, soaked overnight
- 1 cup full fat coconut milk
- ⅛ teaspoon vanilla powder (optional)
- ¾ cup maple syrup
- 1 TBSP vanilla extract
- pinch of salt
- 1 TBSP melted coconut oil
- Juice of 3 limes
- Strawberry Swirl Sauce:
- ¾ cup frozen strawberries
- ¼ cup fresh raspberries
- ⅓ cup maple syrup
- Prepare an 8x8 square pan with parchment paper. Take two long piece of parchment and lay one across the pan vertically and the other across the pan horizontally. The excess hanging off the edges will act as handles and allow you to lift it out of the pan easily when you are finished.
- For the crust:
- Place all the ingredients into a food processor and process until it's fully combined and sticking together. Then press it into the bottom of your prepared pan in a flat even layer.
- For the cheesecake filling:
- Combine the drained and rinsed cashews, milk, vanilla powder, and maple syrup in a Vitamix and blend until smooth (About 2 minutes). Add the rest of the filling ingredients and blend until combined. Pour this layer on top of the crust.
- For the strawberry swirl sauce:
- Place all the sauce ingredients into a small sauce pot and bring to a simmer. As you simmer the sauce, mash the strawberries with a potato masher to help break them down. Once all of the berries are mostly broken down, continue to simmer the sauce to allow the moisture to evaporate and the sauce to thicken and reduce down to a thick enough texture to make a sauce. Strain your sauce through a fine mesh strainer to remove the seeds and strawberry pulp. Check for consistency. If it's still too watery, place the sauce back into the pot and simmer again until it's reduced down to a sauce texture.
- Pour the strawberry sauce onto the filling layer in a swirl motion so you can still see some areas of white between the red. Then take a toothpick and begin swirling the red into the white in small circular motions. The more little circles you the make the better the marbling will look, so don't be afraid to swirl it up.
- Once it looks marbled to your liking, place the pan in the freezer and freeze for 3 hours. Use the parchment to lift the cake out of the pan and slice into squares.